Basic Procedure of Slitter Setting for Slitting Line Machine
The method of fabricating mild steel hollow-section structures entails a sequential arrangement of cutters, plastic 'spacers,' and industrial rings on the slitting-line machine in order to get high-quality steel strips. The method produces circular, rectangular, and square hollow-section structures, as well as 'multi-c' and flat bar strips.
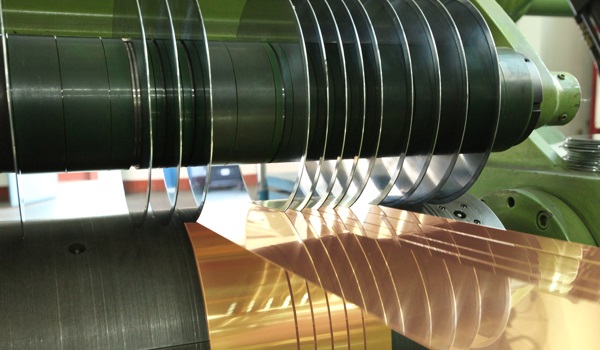
Before the procedure starts, it is necessary to clean the cutters, plastic 'spacers,' and industrial rings. There are two reasons for this; the first is to ensure the equipment's lifetime; the second is that, if left unclean, the cutters may enlarge by a few millimetres owing to dust particle collection, resulting in improper strip widths. Additionally, to these two primary causes, while welding or using oxy-fuel to cut out damaged areas of the strip, the sparks created might adhere to the cutters if they are not properly cleaned, lowering the quality of the hollow-section strips made. Cleaning the cutters, plastic 'spacers,' and industrial rings before and after slitting strips in the slitting line machine is always suggested for superior outcomes.
Prior to organising the cutters, you should have the setup plan for the slitting machine and all necessary items lined up. This simplifies the process and also eliminates problems that might occur when a freshly built configuration fails to function correctly for the first time. After ensuring that everything is in order, you should begin by opening the machine. To begin, unscrew and release the stand-lock bolt, then unscrew the moveable stand-stud screw to separate the stand from the shaft. The top and bottom shafts of the slitting machine should then be drawn apart by moving the hand wheel in an anticlockwise manner until access to the overlapping cutters is gained. After successfully removing the plastic 'spacers,' cutters, and rings, reassemble them according to the width of the strips to be created.
The bush, disc, and rings must all be positioned in accordance with the slitting machine's settings to ensure that the strips rebound equally at the separator shaft throughout the slitting operation. Additionally, rather of creating an exact width spacing between the spacer's discs, an allowance should be made; strips as thin as 1 millimetre should have a 1.2-millimetre leeway, while those as thick as 5 millimetres should have a 2-millimetre allowance. This is mostly because strips of light thickness, such as 1 millimetre, often get out of alignment, and hence need the stated margin of leeway to remain in alignment throughout the process.
Allow the procedure to continue until the desired number and form of hollow-sections are achieved. Once the procedure is complete, verify the setting's correctness by measuring the distance between each cutter. If the length between the cutters is reduced, insert a plastic shim with the precise thickness necessary between the 'spacers'. Typically, plastic shims have a thickness of 0.1 to 0.8 millimetres.
After the procedure is complete, do not combine light gauge and heavy gauge cutters; they should be stored separately. This is primarily because light gauge cutters are designed to cut strips of 1.0 millimetre but can also be used to cut strips of 5.0 millimetre; however, once a light gauge cutter is used to cut thicker material, such as 5.0 millimetre, it should never be used as a light gauge cutter again; otherwise, low-quality strips will result. Additionally, as noted before, you should clean all materials.
Need help selecting the right Slitting Machine?
Since 1972, SlitterLine has specialized in precision slitting equipment, offering expert consultation,
OEM customization, and comprehensive knife grinding services.
Request a technical consultation or project evaluation.
Sales Inquiry: +886-2-2995-7607 | Email: sales@slitterline.com